Friday, October 26, 2012

Haunted Halloween Scene

I thought it would be fun to build a haunted Halloween scene with the kids this year.  Well mostly with Parker.  It was a lot of fun, and we have finally finished it!


We used a box top for the base, and painted it black.  We made houses out of bird houses from Joann Fabric ($1 each) and we painted those black and put glitter on the roofs.  Parker pained spiders different colors and sprinkled glitter on them.  We made a tree out of paper towel rolls and painted it brown and black.  Parker made monsters (the 3 in the back) out of toliet paper rolls.  We painted pumpkins out of styrofoam balls and painted ghost, and added tombstones in the front.  Both kids painted the tombstones and houses.
It took us a few weeks to make but it was fun and is something we can add to years later.

Saturday, October 20, 2012

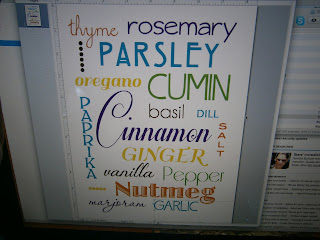
Spices- subway art

I love the look of subway art.  It's been all over pinterest and is a new decor item.  I don't have a cricut or a silhouette or photoshop.  So all the tutorials I was looking to follow you needed one of those items.  I have iworks pages.  I managed to do it.

I really wanted one for my kitchen with different spices.  I'm pleased with how it turned out.

But I'm still on the search for a frame.

Tuesday, October 16, 2012

Organize desk area

I have been racking my brain for a while now on how I can organize my desk area.   I don't have a big desk and that means I don't have anywhere to organize things.  I am too cheap to buy wall organizers.  Especially when I just don't love how most of them look.  Especially if I can't see in them then I won't remember the bills in them.

I was looking on the Martha Stewart  website for ways to cover boxes.  I found she did cereal boxes covered with paper.  All you do is wrap them like a present.  I can do that.  So I went in my pantry and took the graham cracker box and the popcorn box (it's ok if they aren't empty, I have an idea, I need them).  I have scrap book paper left over  and used that.


  • Cut the top and half of the front off of each box
  • Wrap the paper around the sides and front (you don't see the box, so why waste paper)
  • Then it involves alot of cutting and taping
  • I then printed labels for the front of each
  • And used fabric covered push pins, I made before
I love them, so much better then anything I could have bought.  I think I need to make one more though

Monday, October 15, 2012

Trick or Treat, Smell Our Feet

Again, another Pinterest idea.  Although I saw this on pinterest, but there were no directions.  I searched online on how to paint plates that are oven safe.  I found enamel paint is safe to paint and put in the oven.

I went to the Salvation Army and bought a china plate for .90.  I used 2 coats of orange paint, and let that dry over night before adding more.  The next day I took white paint and painted one foot of each kid and put it on the plate.  Then paint around the foot, for the appearance of a ghost.  I used a paint marker in black and wrote, "Trick or Treat, Smell Our Feet" and added bats.

Let that dry 24 hours before baking.  I wasn't sure if my plate was oven safe, I searched too see if China was and I got both replies of yes and no. I went for it, with the thought I could redo if it broke.

Follow the directions of the paint.  Bake at 350 for 30 mins and let cool in the oven.

Saturday, October 13, 2012

"Dream Big Little Ones"

I saw a sign I loved, "Dream Big Little One" and I thought I want that sign in my kids room.  Then while scoping out pinterest I saw a cute night light made on canvas.  It was from the blog, Styleberry.  Here is the link: http://styleberryblog.com/diy-night-light-canvas-a-fancy-grown-up-version-of-light-bright

However, I didn't want to copy either idea completely so I put my own twist on it.  I combined the two ideas.
It was very easy.  I searched online for ideas on how to get the writing style I want (I don't own a cricut machine)


  • First I painted the canvas, 2 coats
  • I found the font and size I wanted
  • Printed it out
  • Cut out the words
  • Color with chalk on the back of the word
  • Lay the words out and trace with a ball point pen (it will trace with chalk very faintly on the canvas 
  • Then I was able to paint the letters, 2 coats
  • After all is dry, you use an exacto knife and poke holes (I went for the design of stars and a moon)
  • You push mini Christmas lights through the holes
Voila!

Friday, October 12, 2012

Homemade "fishing"


I saw a cute on idea, I'm sure somewhere on Pinterest, on making indoor fishing for the kids.  We found sticks in the back yard and tied string to it and a magnet at the bottom.  Then we made fishies out of pipe cleaner and and layed them on a lilly pad ( I didn't have blue felt).


The kids loved it!

Wednesday, July 4, 2012

Monogram door

I saw a cute monogram door on pinterest, and thought that was a nice variation to a wreath.  However, I do still want to make my hydrangea wreath. 
 So I just finished painting my shutters and had extra paint, so that's the what I used for my letter B.  I took a stainless steel scrubber and roughed up the paint.  It was nice got rid of the shiny finish and gave it a bit more of an antique finish.  I made a few rosette flowers and did one yellow for an accent.  I felt like it needed more and added a touch of lace to it.  
I'm happy with how it looks, but feel like it might still need something to pull it all together.  I'm not sure what, but it will eventually come to me.
I'm so happy with the changes.  Big improvement!