Friday, October 26, 2012

Haunted Halloween Scene

I thought it would be fun to build a haunted Halloween scene with the kids this year.  Well mostly with Parker.  It was a lot of fun, and we have finally finished it!


We used a box top for the base, and painted it black.  We made houses out of bird houses from Joann Fabric ($1 each) and we painted those black and put glitter on the roofs.  Parker pained spiders different colors and sprinkled glitter on them.  We made a tree out of paper towel rolls and painted it brown and black.  Parker made monsters (the 3 in the back) out of toliet paper rolls.  We painted pumpkins out of styrofoam balls and painted ghost, and added tombstones in the front.  Both kids painted the tombstones and houses.
It took us a few weeks to make but it was fun and is something we can add to years later.

Saturday, October 20, 2012

Spices- subway art

I love the look of subway art.  It's been all over pinterest and is a new decor item.  I don't have a cricut or a silhouette or photoshop.  So all the tutorials I was looking to follow you needed one of those items.  I have iworks pages.  I managed to do it.

I really wanted one for my kitchen with different spices.  I'm pleased with how it turned out.

But I'm still on the search for a frame.

Tuesday, October 16, 2012

Organize desk area

I have been racking my brain for a while now on how I can organize my desk area.   I don't have a big desk and that means I don't have anywhere to organize things.  I am too cheap to buy wall organizers.  Especially when I just don't love how most of them look.  Especially if I can't see in them then I won't remember the bills in them.

I was looking on the Martha Stewart  website for ways to cover boxes.  I found she did cereal boxes covered with paper.  All you do is wrap them like a present.  I can do that.  So I went in my pantry and took the graham cracker box and the popcorn box (it's ok if they aren't empty, I have an idea, I need them).  I have scrap book paper left over  and used that.


  • Cut the top and half of the front off of each box
  • Wrap the paper around the sides and front (you don't see the box, so why waste paper)
  • Then it involves alot of cutting and taping
  • I then printed labels for the front of each
  • And used fabric covered push pins, I made before
I love them, so much better then anything I could have bought.  I think I need to make one more though

Monday, October 15, 2012

Trick or Treat, Smell Our Feet

Again, another Pinterest idea.  Although I saw this on pinterest, but there were no directions.  I searched online on how to paint plates that are oven safe.  I found enamel paint is safe to paint and put in the oven.

I went to the Salvation Army and bought a china plate for .90.  I used 2 coats of orange paint, and let that dry over night before adding more.  The next day I took white paint and painted one foot of each kid and put it on the plate.  Then paint around the foot, for the appearance of a ghost.  I used a paint marker in black and wrote, "Trick or Treat, Smell Our Feet" and added bats.

Let that dry 24 hours before baking.  I wasn't sure if my plate was oven safe, I searched too see if China was and I got both replies of yes and no. I went for it, with the thought I could redo if it broke.

Follow the directions of the paint.  Bake at 350 for 30 mins and let cool in the oven.

Saturday, October 13, 2012

"Dream Big Little Ones"

I saw a sign I loved, "Dream Big Little One" and I thought I want that sign in my kids room.  Then while scoping out pinterest I saw a cute night light made on canvas.  It was from the blog, Styleberry.  Here is the link: http://styleberryblog.com/diy-night-light-canvas-a-fancy-grown-up-version-of-light-bright

However, I didn't want to copy either idea completely so I put my own twist on it.  I combined the two ideas.
It was very easy.  I searched online for ideas on how to get the writing style I want (I don't own a cricut machine)


  • First I painted the canvas, 2 coats
  • I found the font and size I wanted
  • Printed it out
  • Cut out the words
  • Color with chalk on the back of the word
  • Lay the words out and trace with a ball point pen (it will trace with chalk very faintly on the canvas 
  • Then I was able to paint the letters, 2 coats
  • After all is dry, you use an exacto knife and poke holes (I went for the design of stars and a moon)
  • You push mini Christmas lights through the holes
Voila!

Friday, October 12, 2012

Homemade "fishing"


I saw a cute on idea, I'm sure somewhere on Pinterest, on making indoor fishing for the kids.  We found sticks in the back yard and tied string to it and a magnet at the bottom.  Then we made fishies out of pipe cleaner and and layed them on a lilly pad ( I didn't have blue felt).


The kids loved it!

Wednesday, July 4, 2012

Monogram door

I saw a cute monogram door on pinterest, and thought that was a nice variation to a wreath.  However, I do still want to make my hydrangea wreath. 
 So I just finished painting my shutters and had extra paint, so that's the what I used for my letter B.  I took a stainless steel scrubber and roughed up the paint.  It was nice got rid of the shiny finish and gave it a bit more of an antique finish.  I made a few rosette flowers and did one yellow for an accent.  I felt like it needed more and added a touch of lace to it.  
I'm happy with how it looks, but feel like it might still need something to pull it all together.  I'm not sure what, but it will eventually come to me.
I'm so happy with the changes.  Big improvement!  

Saturday, September 24, 2011

T-shirt Scarf

I went to a craft night, the other night, at my sisters house.  We made scarfs out of t-shirts.  I saw one on Pinterest that I really liked.  Oddly enough I even had a t-shirt that was almost the same color.
(I wish I could get a better picture.  If I do I'll repost it)

It was so simple, I cut my shirt in 1" strips, tied 1 end together, braided, and then attached the two ends together and took a little strip cut from my t-shirt to cover the combined ends.

Not much of a scarf for warmth, but very stylish. I was so excited to wear it!

Friday, September 23, 2011

Caterpillar

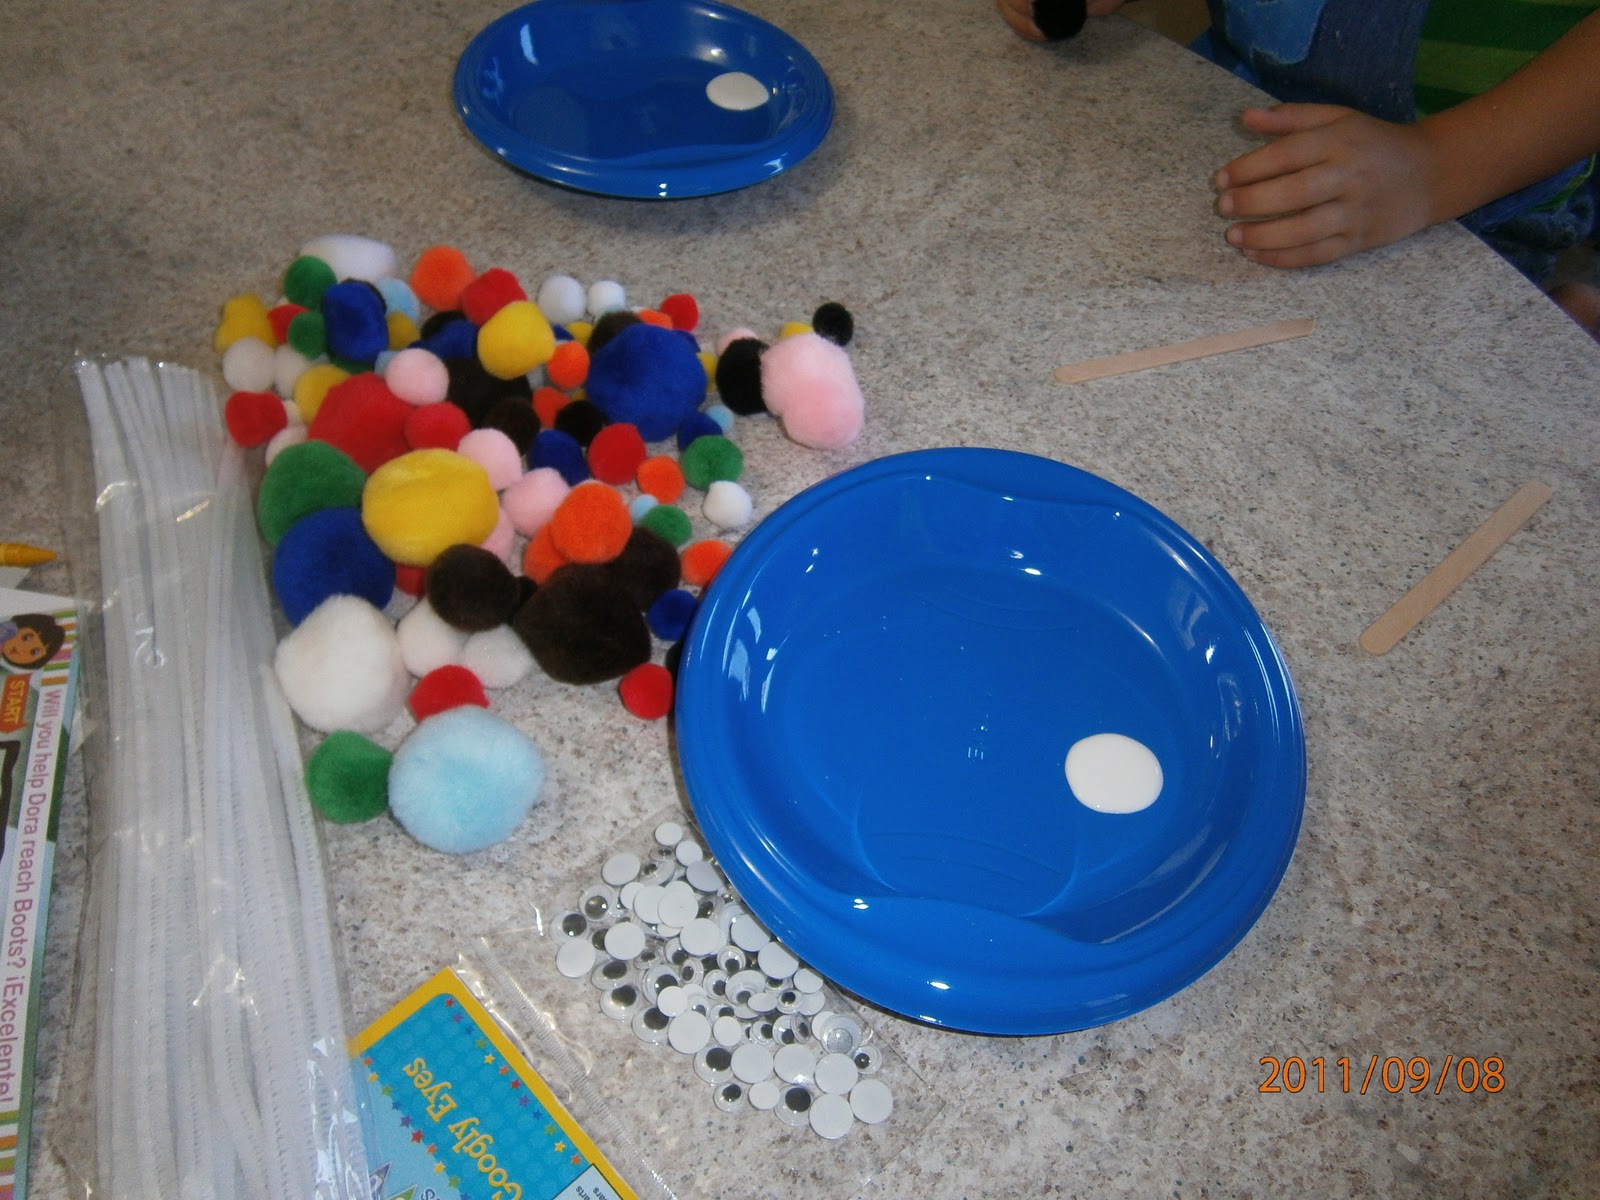
I was watching my neice and nephew one day, and while the little kids were sleeping I wanted to do a craft with the older two.   We made caterpillars out of pom poms and a popsicle stick.
Supplies needed:
I did one with the kids to help show them how to do it.  They each were given a popsicle stick and a plate with glue on it.  They dabbed the pom poms into the glue and placed on the popsicle stick.  When they had the body all finished, I helped glue the googily eyes on.  Then I cut the pipe cleaner in 1/4's and we wrapped it behind the head to make the antenna. 
These were a lot of fun. They made 2 each.  Next time I think we would need to use more glue, they didn't quite stand up to the playing of 3 year olds.
I have seen cute blogs that have made the Hungry Caterpillar and that would be fun to do.  All you'd have to do is added the food! Who doesn't love the Hungry Caterpillar? :)

Thursday, September 22, 2011

Hair bow

So I've decided that I'm no longer going to buy hair bows for Kinsley.  After looking at them, it's too easy to make my own.  One version that I have made is:

I had some little silver prong clips at home and bought a bunch of ribbon in the dollar section at Target.  I used hot glue to wrap the ribbon on the clip.  Then I just played around with making different bows until I made one that I liked and that was symmetric, and glued the center down.  I took a small piece of the same main ribbon and turned it inside out and covered the middle.

Wednesday, September 21, 2011

Jelly fish

Wow we do have a lot of rainy day crafts.  We made a jelly fish out of styrofoam bowls, ribbon, and marker.
Supplies needed:
2- styrofoam bowls
markers/ paint
ribbon- cut in a different lengths
string
paper clip
elmers glue

First decorate the out side of 1 of the bowls.  Then you want to take ribbon and glue them on the inside of that same bowl.  We glued closer to the bottom.  Then take the remaining ribbons (use different sizes) and glue them together.  Set those aside to dry.  
Then take your 2nd bowl and put glue all around the outside of it.  You then take the 1st bowl and set it on top. (Be careful not to get your ribbons in the glue)  
You then poke 2 holes in the top of both bowls (that's where you pull your string through) then take the paper clip and run the string in it and clip the cluster of ribbons in it.

This would be really cute to make a few and be able to make an aquarium.  I hope we get around to that. :)

Tuesday, September 20, 2011

Popsicle Airplane

Another one of mine and Parker rainy day projects was an airplane made from popsicle sticks.

I saw this craft on pinterest, but had to alter it slightly.  One way of doing it, was to paint the popsicle sticks.  Waiting for the paint to dry was going to take too long for our attention span.  So we colored them with markers instead.

Supplies needed:
1- clothes pin
3- popsicle sticks
markers
hot glue

You take your clothes pin and color that first.  After you color your 3 big sticks you then take one of them and cut it in half.  Then I took the hot glue gun and glued the 2 big ones to the front of the clothes pin and then glued the 2 little sticks to the back.
Another fun and easy craft!

Monday, September 19, 2011

Felt Flower

My sister and I have started to make headbands and hair clips.  One that I have made was the flower made from felt.  I saw it on Martha Stewart, and I embellished it with sequence in the middle.  I then attached a hair clip to the back.  It's one of my favorite flowers and takes about 10 mins to make.
I really like the color combo of charcoal gray and lime green.  I'm thinking about making more and doing a trio on a headband.

Sunday, September 18, 2011

Cotton Ball Sheep

It was a rainy afternoon, so Parker and I made cotton ball sheep.  I couldn't get my printer to work so I had to hand draw the sheep for him.  I then put glue, on a plastic plate, for him to dip the cotton balls into glue and put on the body of the sheep


He loved it.  Great activity and not very messy!

Thursday, September 8, 2011

Craft organizer

So I was constantly putting all of my craft supplies in different areas, keeping them in bags, and never able to find anything.   So I won't say it's 100%, but it's a start.  I have my before and after photo:


I bought a sweater holder in the dollar section at target for $2.50

Thursday, August 25, 2011

Fruit Fly Trap

I saw this idea for a fruit fly trap and thought I'd give it a try.
So I took a piece of paper and rolled it up diagonally, put that in a magic bullet cup, and wrapped cling wrap around it.  I taped where the hole around the paper tube and the cling wrap met so they couldn't sneak out that.  I taped the cling wrap around the cup as well.  Put a piece of banana in the bottom and watch it fill up.
It's a lot less messy then some ways.

Wednesday, August 24, 2011

Sidewalk Paint

This was fun and so easy to make.  It only lasted for about 30 mins before they dumped the cups. :)
I used a muffin pan and put styrofoam cups in it.  Then you mix 1 C of water and 1C of cornstarch, and then put food coloring in the different cups.

Parker and Kinsley loved helping mix them.

Then I bought four brushes at Farm and Fleet for .50 each.  
 They had so much fun, I think we'll do it again tomorrow. :)
It's pretty messy though, so I hope it comes out of the clothes.

Tuesday, August 23, 2011

Clean microwave!

So great tip I found on pinterest.  To get a clean microwave, put a bowl with water and vinegar in for 5 minutes.  The steam will help loosen set in food.  After you take it out everything wipes off very easy, no scrubbing.

Sunday, August 21, 2011

What a difference paint can make

I am so proud at my new front door.  What a change just a coat of paint can do (or 2).  Now I just need to get time to finish the rest of the painting of my house.

Love!

Saturday, August 20, 2011

Curtains

I have made most of the curtains in my house.  I thought that would be a nice way to save money, and then I learned it can actually be more expensive to make your own than it is to buy them.  It's a nice way to get just want you want though.  So for Parker's room:

Kinsley's room, I had to be creative with the top, because the length wouldn't be long enough, so I used ribbon:

The ones in my kitchen turned out best.  I used a sturdier fabric:
Next will be ruffle curtains for our bedroom :)